 |
| One of the red efts I find regularly on the LHHT - Route 31 shelters |
My blogging has been slow since February of this year, actually nonexistent. Here's a little to fill in my gap... Ice season was pretty much a bust, but ski season was unbelievable. The Laurel Highlands got dumped on with an abundance of natural snow this past winter. Laura and I spent a great deal of time skiing at Seven Springs in their award winning, Terrain Parks. This type of skiing is well known for producing an abundance of injuries to its participants. Here's a couple of skiing pics...
 |
| Railslide - The Streets @ Seven Springs |
 |
| Light pole bonk over the gap - The Streets @ Seven Springs |
My injuries included (but weren't limited to) a broken thumb, Injured (most likely broken) ribs. A bruised hip (which prohibited any running until about 5 weeks ago) and a second injured shoulder that has severely restricted my climbing. Unlike last season, I'm slowly trying to rehab it back to health. For now, I can barely dead hang on it. On a positive note, my injured shoulder from last season can now support free hanging body weight. The path back to stronger climbing might be slow and long, but climbing less challenging routes will produce an abundance of fun in the meantime. Throughout the spring Laura and I spent a fair number of days at various local crags climbing, doing trail work, etc. Bouldering has seemed to be our most focused style this year.
With my hip feeling better, I've recently been working my legs back into running condition. For the first couple weeks, I'd been testing my hip and seeing if limitations existed. I started with short, slow, road runs not much longer than 4 miles. Usually a rest day or two between runs. I felt good, with a only a couple days where my hip showed any signs of discontent. After two weeks back, the hip pain seemed to disappear completely. I quickly started stacking on the miles and feeling positive that longer pain free miles in the woods lay ahead.
 |
| Trusty footwear, Altra Lone Peaks and Powersox get my thumbs up! |
This past week I managed to log 83 miles of running. All of them on the Laurel Highlands Hiking Trail. For those unfamiliar with this trail it's a 70 mile hiking trail that starts in Ohiopyle State Park and follows the crest of Laurel Ridge north to Seward. It's a unique trail due to the fact that it has numbered, concrete markers at each mile along its entirety (a great feature for pacing and location). Built as a backpacking trail in the 70's it was designed to be covered over a week long period. Adirondack style camp shelters with additional tent camping areas are located approximately 10 miles apart along the trail. This distance makes for easy hikes between shelters. Note: (reservations must be made in advance to stay in the shelter areas overnight). While designed as a backpacking trail, the LHHT is an amazing trail for runners. The whole trail is completely runnable single track that flows over the mountains through amazing scenery. Hardwood forests, rock outcrops, streams, lakes, and wildlife are the normal backdrop along this trail. I feel quite lucky to live and have grown up a short distance from the Rt. 31 trailhead (middle) of the trail. Starting from home allows easy access to either end of the trail. I must admit that I do spend the majority of my time on the southern half of the trail enjoying the larger elevation changes. Along with the LHHT, there's plenty of other great trails in our neck of the woods. Roaring Run Natural Area, Ohiopyle State Park and The North Woods are some of my other favorite trails to run.
 |
| Typical mile marker along the LHHT |
Yesterday I completed my first half trail run since last year. Laura dropped me off at 31 parking lot and I went south passing a record (for me) 106 trail users along the way. Outside of the Laurel Ultra race day, I've never seen that many trail users on those sections. I stopped to chat with some of them. Here's just a few that I recall... I got a "nice beard" shout-out from a group of resting backpackers while crossing county line road. I met three trail runners from the Virginia Happy Trails Running Club enjoying an out and back run from the route 31 trailhead to Grindle Ridge Shelters. They were up for "Stills in the Hills" whiskey and music event at Seven Springs and decided to run a bit before the festivities. I met a nice younger couple that had their chocolate lab with them near route 653. They were heading in to Grindle Ridge shelters for the night. He was an experienced packer, but this was her first trip. She was smiling as she explained of her new pack and gear required to make the trip. Her excitement was quite infectious as I recalled how much I enjoy new "toys" as well.
 |
| Seven Springs Mountain Resort, the highest point on the LHHT |
I was met by Laura sporting the mobile aid station at Maple summit parking lot. She provided some love and a water fill before the last stretch into Ohiopyle. Our plan was for her to park in Ohiopyle and start hiking north until we met. That way we'd get to enjoy a little trail time together. Ohiopyle was packed due to the beer and gear festival being held Saturday night. Please note this was the second booze and bluegrass festival along the trail... All kinds of partying going on in the Laurel Highlands! Laura decided to park up at King Mountain trail head and avoid the congestion. Laura was sore from previous runs this week and decided to carry a large backpack to remove the temptation of running. While she hiked north, I managed to float the flatter miles from Maple Summit down to milepost 8 to begin the "hilly" section of the LHHT. As I ran by the 8 mile marker, missing paint on the number 8 had me do a double take out of confusion. This quick glance over my shoulder was enough for me to snag a toe and go airborne, I tried to recover, but my efforts were futile. Head first into the woods Ughhh, I landed with a thud! Quickly I sprung back up and moving again checking for any blood or pains. Slightly dazed, but unscathed. Yep, got my attention and milepost 8 was still 8, not an imaginary 9?!?!? I proceeded to bomb down "heart attack hill" more alert to my footing as a stumble like minutes earlier would surely produce a less funny story.
 |
| The view after ascending from Bidwell |
I cruised along finally meeting my sweetie just before milepost 3 I was heading uphill and she was coming down. I slowed to a hike at this point and we enjoyed the last several miles hiking back to the car together. We stopped at the 2.5 mile overlook for a few minutes enjoying what we usually pass by at a brisk pace. The additional 1400' of elevation gain at the end hiking up to the trail head produced more heavy breathing and I officially stopped my watch at 6:26:55. Quite a bit slower than my personal best for this run, but still a respectable time given my "casual" approach. I'll wait a little while and do this run again and see how much I can improve on this time.
Upon reaching the car we unpacked the mobile aid station and set up our chairs. Laura had packed a primo after trail picnic for us. We proceeded to kick back, eat turkey sammies, and drink chocolate milk while listening to the sweet sound of live bluegrass music coming from the festival below. What a great end to another day on the LHHT.
 |
| Laura and the mobile aid station setup at the end of the day |


 When I was a child my mom always wanted to know what kind of bird it was that made a noise that, to her, sounded as if it was saying 'come here, come here'. Since she thought it sounded like it was saying that I have always thought so, too. We could always hear the bird but could never get a good look at one. Usually we only hear this bird when we would go camping, or hiking in the mountains or desert. Since we have moved to the Tumbleweed Crossing I have discovered what the bird is. It is the Ash-throated Flycatcher. There are lots of different flycatcher birds all over the world and several different kinds in the US. All are similar and I didn't know what the proper name for our kind of flycatcher was until recently when I finally found it on the internet. These interesting little birds are kind-of built like a swallow only larger. They are mostly grayish on back, wings, head, and tail, but have a dull yellowish color to their belly area. Males and females look alike. They disappear in the fall and winter. I assume they migrate south probably to somewhere in Mexico. But the come here to nest. I usually have one or two pairs near my house each summer. They usually build their nests in a cholla cactus just on the edge of our property but this year they built in a cottonwood tree next to the horse pens, and hay shed. Every time I walk by it they fly off yelling 'come here, come here'. But return quickly and watch what I am doing as I feed, water, or pet horses. I had seen the nest before I knew which bird was using it. I had thought it might be an English sparrow nest as it had so many pieces of string, paper, tumbleweed sticks, and a piece of cloth in it. It was a couple of days before I actually saw a flycatcher on it which can't be seen in the photo of the nest. I welcome all flycatchers as they eat lots and lots and lots of flying insects especially flies which is where they get their name. I have seen them perched on a tree or power line and suddenly fly down to scoop up an unseen insect and then back to their perch they go. They will do this over and over. They come in to the water I keep in hubcaps in the back yard each evening.


 Snow is accumulating at Paradise. I measured 46" total, with 15" of fresh snow this morning. It looks and feels like winter and if the park were open, skiers, boarders and snowshoers would be enjoying the early snowfall. But the floods really did a number on the roads and as the days pass, it becomes more clear how complicated the damage is, especially with the prompt arrival of winter.
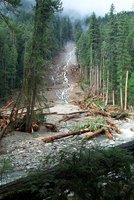
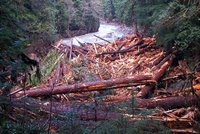 Here is the primary deposition zone for all of the timber that was unearthed in the same landslide.
  The river also moved and in doing so, took a couple of the campsites with it. Here is the new loop C of Ohana.
  On the afternoon of Tuesday, July 1, a climber fell approximately 15 feet into a crevasse at around 11,400 feet on the Kautz Glacier of Mount Rainier while descending the Mountain. The injured climber, Mitchell Bell, was rescued from the crevasse by his four teammates. Bell had injured ribs and visible lacerations to his head and face, but he was conscious and in stable condition. A doctor in the team quickly determined that due to his known and potential injuries, Bell could not continue the descent without assistance. Two members of the party climbed down in search of help, leaving the doctor, another teammate, and the patient at the scene. Back at Camp Hazard about 1,000 feet below, they found Alpine Ascents International (AAI). Several AAI guides responded to the request for assistance and contacted the National Park Service. A plan was put in place for two AAI guides to travel to the accident scene that evening to assess the injured climber’s condition and bring with them materials for an overnight stay on the Mountain. Based on their assessment, the Incident Commander, David Gottlieb called for air-lift/hoist extraction the following morning.
 Within an hour of take-off on Wednesday morning at approximately 6:45 a.m., a US Army Reserve Chinook helicopter from Fort Lewis successfully extracted the injured climber from the Kautz Glacier. The patient was transported to Madigan Hospital for further medical evaluation. He was released later that day.
  Looking South from the top of the bluff.
 This is why it is called Cape Blanco. As I drove up to the park, the sky changed from a beautiful blue to white and the temperature dropped eight degrees.
 Within two hours the fog completely blanketed the area...


 Spare bicycle parts, a restless spirit, and a willing "guinea pig" can make for a dangerous combination. In her latest reincarnation, Marianne sports VO Belleville handlebars and Dia Compe inverse brake levers - a practice run to determine how a similar set-up would feel on the Royal H. mixte.
 Here are the bars and levers in all of their French glory - on a Motobecane mixte with an Ideale saddle.
  The Belleville handlebars are similar to the Porteur handlebars shown here. Both are a classic style of upright bars found on vintage French city bicycles. These bars are narrow, with long gripping areas that are nearly parallel to each other - placing the rider's hands in a position similar to holding a tray. The Bellevilles are 5cm narrower than the Porteurs (43cm vs 48cm) and are completely straight across the front (whereas the Porteurs have a slight forward sweep).
 It is typical to see handlebars like this fitted with inverse brake levers. My assumption is that this is done to maximise the gripping area of the bars. Because the levers are installed at the ends, there are no interruptions along the handlebar's surface and the cyclist is free to move their hands pretty much along the entire bar.
 The inverse brake levers you will find today are most likely either Tektro or Dia Compe. Here I have installed the latter, and you can see that their brown rubbery tips go nicely with twined handlebars. It surprised me to learn that some dislike the Dia Compes because of the brown tips and prefer the Tektro levers instead - which are all-metal. To me, the rubbery surface felt nice, but I suppose it isa matter of personal preference. If you have used either of these levers, I'd like to hear your thoughts.
 Braking with inverse levers. I have found that I am able to get pretty good leverage almost no matter where I hold my hand along the bar, with the exception of the very front.
 Can't brake from here, near the corners. But if I move my hands 1-2 inches back, it will work. This set-up is amazingly versatile in terms of the hand positions it allows.
 The inverse levers are set back from the bars far enough so that they do not interfere with the grip. You can see in the pictures that they are nowhere near my knuckles. Truly a neat design.
 If you are curious about this type of French set up, both the bars and the levers are surprisingly inexpensive. You will like them if you are a fan of narrow handlebars, and if you prefer to hold your hands to the sides rather than flared out or straight in front of you. I certainly fit that description, so both the Belleville and the Porteur handlebars feel as if they were made just for me. The super-wide Albatross bars were comfortable enough, but with the Bellevilles and the Porteurs I get that "spot on!" feeling. I also think that they are better match for French bicycles - especially for the Motobecane's aggressive handling.
 I will pause and confess here, that this is the last change I will be making to Marianne...because she no longer belongs to me. Yes, I did sell her after all - to a lovely local woman whose acquaintance I had the pleasure of making this morning. Riding the Motobecane with the French handlebars and inverse levers yesterday, I finally felt that this bicycle was "perfect" and experienced a calm sense of satisfaction - not dissimilar to how I feel when a painting is finally "finished" or when a photograph looks just right. And after that, it finally felt appropriate to let her go. I hope the new owner enjoys her as much as I hope to enjoy my Royal H. mixte - which I will most definitely fit with a similar handlebar set-up.


